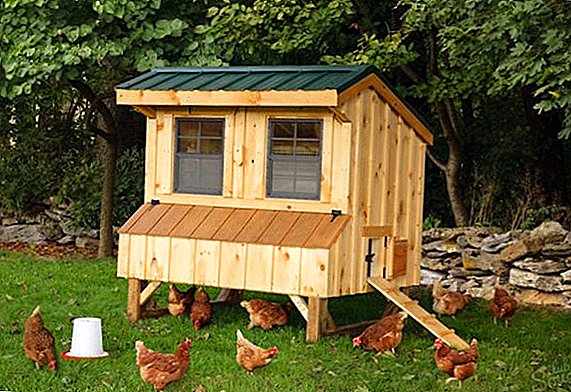
 If you decide to start in the country or the plot of chickens, but never faced with the arrangement of housing for them, this article is for you. We will tell you in detail how to make a chicken coop with our own hands.
What should be the temperature and lighting for the chickens
Chickens do not tolerate cold and are not adapted to winter. If they are often supercooled, it is easy to get an acute respiratory disease.
Did you know? Science knows more than 700 breeds of chickens. 32 rocks are extinct, and 286 are on the verge of extinction.
 In harsh winters, we recommend very seriously to do the insulation of the house. The optimal temperature in the chicken coop should be within 12-17 degrees. If the thermometer shows less than 7 degrees of heat, then the bird's house must be insulated urgently. To do this, you can use:
- "stoves";
- electric heaters;
- heat gas guns;
- IR lamps;
- heaters.
But usually for a comfortable wintering chickens enough and thick litter on the floor. In the spring it will be an excellent compost for the garden. In order to warm the chicken coop with litter, put sawdust on the floor or with a layer of straw no higher than 8 cm. Periodically refresh it after tamping. In spring, the litter will reach 30 cm. So that it does not lose its looseness, sometimes stir it with a pitchfork.
The effect of the litter is that during composting a sufficient amount of heat is released to maintain the optimum temperature. Heat delays rotting chicken manure, disinfects viruses and bacteria, and sawdust and straw are excellent insulating material. But it should be noted that there should be good ventilation in the coop so that ammonia emissions do not accumulate there.
Chickens can walk in the cold, but only in a specially equipped place. The site must be cleared of snow, covered with a canopy and a fence from the vagaries of weather. Arrange the litter on the floor of the site. It is best to make manholes from the house directly to the place of walking, but they must be covered up. When it is more than 12 degrees of frost outside, chickens should not be let out for a walk.

Important! Maintaining the optimum temperature in the house affects the egg production rate of chickens in winter, increasing it by 40%.
Chickens lay eggs only for procreation. In winter, poultry do not have such a need. But you can create a "spring" for chickens right in their home. To do this, you will need artificial lighting, which you compensate for a short winter daylight hours. Lamps should be switched on from 6 to 9 am and from 6 to 9 pm in the evening. But the main thing - do not overdo it. Light day should not be longer than 14 hours, otherwise the birds will not have time to rest, which will negatively affect their egg production.
Did you know? Chicken proteins are very similar to tyrannosaurus proteins. In this regard, scientists suggest that the meat of a tyrannosaur in taste was very similar to chicken.
Where to place and how to make roosts for birds
Inside the chicken coop you need to make troughs and shelves, but the most important thing is to properly equip the nests and perches. The bar on which the bird sleeps, clasps the crossbar with its paws, and there is a roost, and in the nests of the hen they lay eggs and hatch chicks.
There are several varieties of perches. It depends on the number of birds and the space in the hen house.
 Multi-level perch allows you to place a sufficiently large number of birds in a relatively small area. Chickens have their own hierarchy. They will be divided in such a way that the upper tiers will take the leaders, and the chased chickens will be at the bottom. To prevent the birds from smearing each other with droppings, you need to provide for a distance of 30-40 cm between the crossbars.
Roots in one tier around the house are easy to make yourself. This is ideal for a small-sized chicken coop with a small number of birds. In order for the birds to get settled for the night without problems, the bars should be fixed not close to the wall.
In a small chicken coop, perches on vertical supports would also be appropriate. They represent the pillars of meter height, on which the crossbar of the timber are fixed.
You can build and portable structures. They will allow you to move the roost inside the coop and clean it well. If you have no more than 20 chickens, try making a box for them with a handle that will play the role of a roost. In the box, set the grid so that the litter is collected at the bottom.
For a large house you can make perches in the form of a table with crossbars. To do this, attach to the table small bars, and to them - the crossbar.
To independently make a perch and a nest in the henhouse, you will need The following set of tools:
- hammer;
- nest board;
- timber section 4x4 or 5x5 cm;
- screwdriver or screwdriver;
- self-tapping screws;
- drill;
- jigsaw or saw.
It is possible to fasten the parts together with the help of nails, but the self-tapping screws fix the wood much more reliably.
Before you start work, decide on the parameters of the perch, because your poultry is pleasant to live in a convenient design.
The standard roost is constructed in several stages. First choose a place. Perfect warm wall opposite the window. It is advisable that the cold wind from the door does not reach there.
 For laying hens it is necessary to measure a distance of 90 cm from the floor, and for meat-egg hens it should be 60 cm and fill it with a smooth, non-notched bar. To him using screws attached crossbar. Under them at a height of 30-40 cm from the floor you need to fix the horizontal strips on which the trays will be placed to collect the litter. Also make a small ladder so that your chickens can easily climb to the roost.
The main difference between perches for laying hens is height. They like to settle on the upper floors of the chicken coop. The fact is that the hens should have well-developed muscles, for which they need regular physical exertion. Rising on the roost is an excellent chicken charge. Each layer also needs to provide a comfortable private space so that the chickens do not push each other out of their homes.
Important! Take care that your chicken coop is well protected from predators!
Location and methods of manufacturing feeders and drinkers for chickens
 To keep your chickens healthy and well carried, you need to take care of a regular and balanced diet. It is advisable that the birds receive food at the same time. But since it is difficult to organize timely feeding due to current affairs, it is very convenient to use automatic feeders. Below we will look at several options for home-made drinkers and feeders for chickens.
Where it is best to place the drinkers and feeders
If the chickens walk in the afternoon on a service yard or a designated area, then the drinkers and feeders should not be placed in the house. In this mode of the day, the birds only spend the night in the hen house, so they will not eat or drink until morning. If your chickens spend most of their time in the four walls, then you must equip the coop with feeders and drinkers. They are attached or hung to the wall, and sometimes they are simply placed on a dais. There is no place for feeders on the floor, as the birds will involuntarily step on them and put litter.
Methods for making chicken feeders
There are many options for feeders. Which preference depends on depends on many factors, the main ones being the breed of chickens and the size of the house. Consider a few typical projects.
All ingenious is simple. This postulate well confirms the automatic feeder from a polypropylene pipe. To create it, you will need: pipes of various diameters, couplings and other devices for connecting pipes. The assembly of such a construction does not require much time and special technical skills; a woman and even a teenager can easily cope with it. You need to attach the "connecting joint" to the pipe, and then place a new device in the house.
Works such a feeder as follows: feed is poured into the pipe, after which the top is closed with a lid. Feed under its own force of gravity will flow into the knee. As you eat, the food will go down by itself. One charge of feed can be enough for a week. A great option for a small farm.
If there are many chickens, replace the connecting bend with another pipe. It needs to be fixed horizontally. Chickens can get food from the holes that need to be made in the lower tube. This trough will save your time and place in the house. But this design has one drawback - there are no limiters. Therefore, birds can easily climb the pipes and contaminate feed.
Another feeder can be made from a plastic bucket, a sectional bowl for dogs, or dishwashers for vegetables. In the bottom of the bucket we make as many holes as there are compartments in your partitioned plate. We connect the bucket with the partitioned machine with screws - and the feeder is ready. Pour food into it and cover the bucket with a lid. Place or hang the feeder so that the chickens can comfortably reach the feed.
The next version of the feeder for chickens will require a minimum of time and effort from you. To implement it, you need to prepare a clean and dry container with a plastic handle, a sharp knife and a netting net. In front of the plastic trough, you need to make a small cutout, and slightly cut the handle itself so that it can be easily hooked onto the netting net that houses the chicken coop. It remains only to place the feeder at a comfortable height for the chicken and do not forget to pour food into it.
 You can make a feeder out of plywood. To do this, cut high walls from a large sheet and make a box out of them. The feeder should be about 90 cm high, which will make it possible to fill a large amount of feed into it at a time. To prevent food from getting stuck at the exit, make the bottom of the plywood with a slight incline to the front of the feeder.
The horizontal platform in front of the inclined part is the place where the feed should be poured. Usually, homemade feeders do not have restrictors, and birds can climb into it and scatter feed. But in this embodiment, there are special bumper limiters. The front should be 6 centimeters high, and the side should be 10-12. You can assemble such a trough with the help of screwdrivers and screws. To make it last longer, disinfect the plywood with antiseptics and cover with acrylic paint.
A convenient chicken feeder can be made from plastic buckets. The main advantage of such structures is that they can be carried and hung where it is convenient at the moment, since the buckets have handles. Food plastic feeders are the most comfortable and hygienic devices.

How to make drinkers for chickens with their own hands
Self-made drinkers for chickens invented by many people. Consider the most popular of them and past the test of time.
Vacuum drinker. To make it, you will need a plastic bottle and a container for a pallet, which can be found in a shed among old things or purchased at a specialty store. To attach the drinker to the wall of the chicken coop, you will need wire frames. Pour water into the bottle and twist the cap. Then we place the container in the frame upside down, leaving a small space between the neck and the bottom of the bowl, the sides of which must be higher than the bottom of the neck so that water does not overflow. Now unscrew the lid - our drinking bowl is ready for use.
 For the open type drinking trough from the sewer pipe, first of all, the plastic pipe itself will be needed. Optimum sizes: two meters in length and ten centimeters in diameter. In a pipe you need to cut with an electric jigsaw or hot knife 4 rectangular holes approximately 30 cm in length. The distance from the edge and between the holes should be at least 15 cm. At the edges of the pipe, tees with plugs are mounted through which water can be poured and drained.
Such a design is easy to connect to the water supply and equip with a valve. In the house drinking bowl is fixed with the help of sanitary clamps of the same diameter as the pipe. The drinker should be at the level of the back of the chicken, then they will not try to swim in it. The construction should be periodically cleaned so that the water in the pipe does not become polluted and does not stagnate.
A homemade nipple drinker for chickens can be made from a large plastic bucket by drilling several holes in the bottom with a 9 mm drill. Insert nipples into these openings. The bucket is suspended at a low height and filled with water. It is very convenient to wash this drinker, but you will have to fill it with water manually.
 Therefore, it will be more convenient nipple drinking bowl, which is connected to the water supply or a large water tank. It will be more difficult to make it, but the convenience and efficiency of such a design are worth it. You will need:
- square tube with internal grooves of size 22x22 mm;
- round tube adapter;
- one stub;
- nipples (at the rate of 3-5 nipples per 1 m of the pipe);
- micro drinkers (as many as nipples);
- flexible hose;
- 9 mm drill bit;
- 3 clamps;
- 1.8 inch radius.
The sequence of manufacturing an automatic nipple drinker is as follows:
- Mark up the pipe before drilling the holes under the nipples. The distance between them should be 20-25 cm.
- We drill holes on the side of the pipe where there are internal grooves.
- Tap into the holes in the thread.
- We put a cap on one side of the pipe, and an adapter and a flexible hose on the other.
- Screw the nipple.
- We install micro-bugs under the nipples.
- We fasten the clamps on the wall of the chicken coop and the pipe in them.
- Attach the second end of the flexible hose to the water supply source.
To avoid leakage, all joints of the drinker should be pre-treated with a FUM tape.
Important! Feeders and drinkers require proper care. Wash them regularly to prevent the spread of infection.
Nest for laying hens with your own hands
If there are nests in the hen house, then there will be much more eggs, and their quality will be better. And the nest protects the eggs from pecking. Before you build it, you need to choose a suitable place. Chickens will be carried only in the nest that meets a number of requirements.
Where to place nests
In the house must be nests for chickens. They are placed along one wall, it is possible in several levels. The main condition - they must be in the most secluded part of the house, be closed and away from drafts. One nest is enough for six hens.
A ladder should lead to the nest, and in front of the entrance should be a perch on which the chicken can rest. Be sure to make a pryazhodka so that the bird does not fall and does not cure.
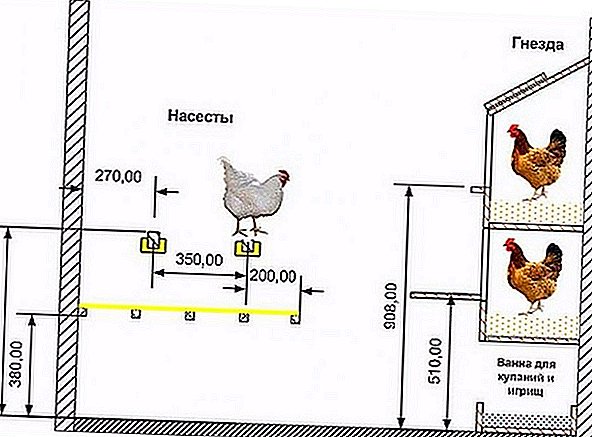 The nest should be quite dark, warm and dry. Well, if there is straw or sawdust. Do not make a nest on the ground, as it is cold and damp there. The ideal height is 30 cm from the floor.
What to make a nest for layers
Consider several options for homemade nests.
Ordinary. For its manufacture a lot of materials and time is not required. Make a nest of plywood, taking as a sample box for vegetables. Put hay on the bottom. This is a very simple, but quite acceptable place for laying eggs.
The nest-battery will be useful for a large household. This design is easy to make at home. To do this, you will need a long board, which must be divided into three parts, and then be constructed on each of them bumpers. Place a bed of hay or straw in the nests. Place the nest at a convenient distance from the floor and place a ladder on it so that the chickens can easily climb to the place where the eggs are laid.
Nest-booth. In the solid board or plywood, make a hole for entry. Attach the front wall. Put straw or hay inside the nest.
 The device with the egg digger is a very convenient nest option if you do not have the opportunity to check the house several times during the day. Such a nest is easy to do with your own hands. It differs from the usual only bottom, which is made with a slope. Eggs roll down into a prepared container. Do not lay a lot of hay in such a nest so that the eggs are easier to fall, but in the receiver itself, spread fabric to soften the fall and prevent the fight of eggs.


