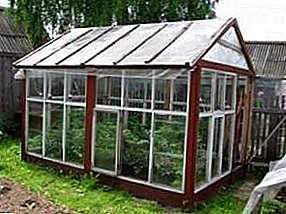
Overnight to collect a dozen window frames for a greenhouse, or a few dozen for a greenhouse - a rare success for a homeowner. Usually it is hidden in the building to be demolished.
Here, as they say, two in one - and many windows, and they are all the same size. But houses are demolished infrequently, and one has to be satisfied with the rare finds of window frames set outside when replacing windows. As a rule, they are all "variegated".
Having set a goal to assemble a greenhouse from the old window frames with your own hands, it is reasonable to install a hard standard windows relatively size, wood conditions. Otherwise, an interesting and fascinating work will turn into an almost unsolvable problem, and a country barn - into a junk warehouse.
Glass or film?
But still let's consider the option of using window frames, lost glazing. Whatever you say, they are much more common.
Installing a new glass will require additional costs:
- Remove the old bead (thin wooden profile, securing the glass in the frame). As a rule, the old bead can not be saved, you have to buy a new one.
- We clean the grooves of broken glass fragments, nails, paint spills. We remove the exact size with a negative allowance of 1-2 mm. A mistake of a few millimeters will lead to the need to expand the grooves with a chisel.
- We order glass in the workshop, we take it to the cottage. Transportation of glass will require reliable packaging of a fragile sheet.
- Coat the grooves with a primer (can be minium) for sealing, we place the glass, fix it with precisely cut shtapik. This requires special thin nails, which also have to buy.
- At the nearest service station we collect a canister of used engine oil. Canisters, by the way, will be there (the devastated plastic 5-liter container from under antifreeze and oil).
- We make a fire, put fire on the bricks a couple of pieces of reinforcement, a sheet of tin on it.
- On a tin sheet put a bucket with a working out, bring to a boil.
- Alternately lower the ends of the timber into the boiling oil, hold for a couple of minutes, then soak the remaining dry surface with hot oil.
- The prepared base is fastened on both sides with steel corners on self-tapping screws, laid along the trench perimeter.
Much easier to replace lost glass cheap transparent PVC film.
 In order to well pull the film under the bead in the grooves, requires considerable skill. The stretch will be easier if you install the film on the outer surface frame.
If the film will sag, in the wind it will soon will tear. Its main enemies are the sun, wind, snow and birds.
Anyway the film will not last long, only one or two seasons. In the spring will have to start the summer season with the repair. Heavy snow cover will inevitably burst film in winter, or it will stretch it heavily.
Under the influence of solar ultraviolet the film loses its transparency, becomes fragile and vulnerable to stress.
To all these disadvantages add the most important - film retains heat poorlyand in the greenhouse the temperature will not differ much from the street temperature.
We design a greenhouse
For the greenhouse will need ten frames. Let's accept conditionally their size 160x60 cm.
 The four frames mounted on the side will be sides of a rectangular greenhouse (two on each side), from two we will make its ends. Four more, laid flat, will turn into opening access hatches.
The result is a rectangular glazed box 320x160 cm
Before installing the frame we clean off the flaky old paint, remove the hinges and other unnecessary accessories, cover with red lead, and then paint in the desired color.
Zero cycle
Greenhouse requires the sun. Surely you have long gone over in his mind all the options for its location on the site, and chose a well-lit place.
Here on this very place East-West axis we mark and dig with pegs and cord a trench of 1,5х3,0 m, depth approximately on a belt.
In the corners trench drive into the bottom one and a half pointed slats 6x6 cm, leaving everything that remains in length above the surface of the earth - then we cut it off by strapping.
Racks on nails row by row raise the trim trench walls. Here will go the old boards and slab.
Base
We will manufacture the wooden base of the greenhouse from a bar 12x12 cm
Four pre-sized window frames process powerful antiseptic according to proven popular recipe:

Attention: Works with boiling oil very dangerous. We use thick clothing, gloves, goggles.
Biofuels and land
We start loading our country "reactor" with fuel. After installing the glazed frames it will be difficult to do.
Fill two-thirds of the trench with branches, mowed grass and weeds (without roots), manure, leaves. Well trample refueling and pour water.
 Greenhouse earth use the one that was dug out of the trench, but it needs to be prepared - sift from the roots of weeds, add fertilizer. If the ground is heavy, mix it with sand and peat.
We pour the prepared earth on biofuel. The level is raised in such a way that 15-20 cm left until the upper cut of the base. The rest of the prepared land is removed in the bags - it will soon be needed for bedding, because biofuels noticeably sagging. We will pour already through access hatches.
Glazing elements
We put the elements of the glazing. Wooden frames are fastened to each other and to the base with metal corners and a steel strip with holes prepared for screws.
Central stiffener serve as a horizontal wooden bar connecting the end frames on top. On this timber we precisely mark and install loops for folding frames, and then the frames themselves - access hatches. We supply the frame-hatches with handles and folding stops.
Get rid of the cracks
The gaps between the frames will negate all efforts to create a warmed environment in the greenhouse. there is reliable way to get rid of them.
Shake the can with foam and shake vigorously. We attach a flexible plastic tube to the spray head (it is attached to the wall with adhesive tape, as on the juice packaging). The tube is inserted into the slot, a little push on the spray head, blowing out the opening with foam.
Quickly go to the next slot, repeat the operation, not forgetting to shake the can. It must be used for several minutes continuously, otherwise the hole and the tube will be hopelessly clogged.
Foam increases many times in volume and dries quickly. The next day, with a sharp knife, cut off the excess hardened foam, paint over the joints.
Finishing touch
In a conspicuous place in the greenhouse install thermometer. The temperature is adjustable by opening and closing the vents.
A photo
Next photo of greenhouses from the old window frames with their own hands:


