Phalaenopsis orchid is considered to be a rather unpretentious plant for growing at home.
However, there are certain nuances concerning its transfer to a new place.
Because of the structure of the root system, this flower is quite easy to harm. Therefore, conducting the process of transplanting, you should follow certain tips and recommendations.
In the article we will step by step explain how to transplant this plant, show the photo.
Short about flower
Phalaenopsis is a perennial herb belonging to the Orchid family.. It is an epiphyte and grows on tree branches or snags, without parasitizing them. Phalaenopsis prefers a humid tropical climate, so it can be found in the forests of Australia, the Philippines and Southeast Asia.
It grows only up and can reach a height of 50 cm. Large, colored in different shades of phalaenopsis flowers outwardly resemble the wings of butterflies, which was the reason for the name - Phalaenopsis (moth-like, moth).
The importance of intermittent transplant
Transplanting is a must-care procedure.Because his health and development depends on it.
Phalaenopsis needs to be periodically transplanted, since every 2-3 years it is necessary to replace the packed substrate with a new one.
In addition, the continuous development of the root system of the plant also from time to time requires the replacement of the container in which it is located. These factors should not be ignored, since the absence of a periodic flower transplant can lead to the development of diseases and its death.
The reasons
 Plant Root System Disease - can be identified by signs such as: yellowing of leaves, dark color of roots, their drying and the appearance of black spots on them. Occurs most often due to improper care of the plant (excessive watering, low air temperature).
- Depletion of plant substrate - over time, the soil tends to flatten and form dense lumps, as a result of which it prevents the access of air to the roots and causes oxygen starvation of the plant. This can be seen from the change in the consistency and color of the soil, as well as the rotting of the substrate.
- Plant root growth - leads to the enveloping of the entire space and clogging the holes for the drainage by the roots. As a result, there is a waterlogging of the soil, since water does not seep through clogged drainage holes.
- Pest damage - most often the plant affects the mealybug. If spraying does not help get rid of pests, a flower transplant is needed.
 Plant Root System Disease - can be identified by signs such as: yellowing of leaves, dark color of roots, their drying and the appearance of black spots on them. Occurs most often due to improper care of the plant (excessive watering, low air temperature).
When can I perform the procedure, and when not?
Phalaenopsis is not recommended to replant after purchase, if it is in high-quality soil. It is better to transplant the plant one year after purchase.. The exceptions are cases after purchase:
- phalaenopsis loses balance and cannot be in a vertical position due to large foliage or poorly chosen capacity;
- in the pot is a small amount of substrate, because of which the plant hangs in it;
- plant roots are in poor condition. In this case, the diseased parts of the plant are cut, treated with activated charcoal and planted in a new soil.
Season
 The best time to transplant a plant is spring, approximately March-April.. At the end of April, after the dormant phase, active growth of the roots and leaves of phalaenopsis begins, therefore it is recommended to have time to transplant the plant before this time.
It should be borne in mind that if phalaenopsis had flowered in the spring, it is better not to replant it, so as not to harm it by interfering with the root system. Repotting is better to start after flowering.
Emergency moving to a new pot
It is carried out in the following cases:
- Full decomposition of the soil. This is evidenced by its ability to retain moisture for a week or more.
- Root disease. The roots of the plant become black and dry, the leaves fall or have a painful appearance.
Nuances depending on flowering
For phalaenopsis, there are unified transplant rules. However, the development phase of the plant should be considered.:
- Transplantation of flowering phalaenopsis is performed only in emergency cases, when a flower is diseased or when it is damaged by pests. If the plant is not in danger, transplantation is recommended to postpone.
- When transplanting non-flowering phalaenopsis, it is necessary to remove damaged leaves and roots, if any. Then leave the plant in a weak solution of potassium permanganate for 5 minutes. The same solution is used to treat the soil prepared for planting Phalaenopsis. After that, the plant is washed with warm water and treated with Fitoverm.
- Fallen phalaenopsis transplants are carried out in the same way as non-flowering transplants. Also, to reduce the load on the plant you need to remove the spike.
Ways to transplant
One of the ways to transplant phalaenopsis is to separate the baby, that is, the young process of the plant.
Separate the baby when its roots reach a length of 5 cm.
To separate the kids need:
 carefully cut the baby off the mother plant;
- half an hour after the separation, babies sprinkle slices of charcoal powder;
- put a small amount of claydite on the bottom of a plastic pot and place it in the center of the baby, straightening its roots;
- pour bark of fines into the pot, put a layer of moist sphagnum on top;
- after 2-3 days the baby can be watered.
 carefully cut the baby off the mother plant;
Another way is grafting. To do this, the faded stem or lateral shoot should be separated from the plant, which must have at least two axillary buds. These cuttings are first grown on a wet substrate in a small greenhouse, and then transplanted into the ground.
Step-by-step instruction
Preparatory stage
Before transplanting, you need to prepare the necessary materials and tools in advance. For this you will need:
- a transparent pot 2-3 cm larger than the previous one so that the roots of the plant can be freely placed in it;
- sharp scissors for cutting the diseased parts of the plant, if they are found;
- substrate for orchids from pine bark and sphagnum moss (purchased from the store or cooked by yourself);
- support for sustainability;
- means for sterilizing instruments;
- activated charcoal, chalk or cinnamon for processing cut points.
Removing from tank
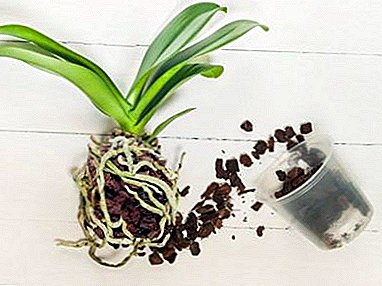
Remove the plant from the pot should be very careful not to damage the rootswhich are quite long, tangled and tightly attached to the substrate.
For easy extraction of a flower, you need to knock on the walls of the pot and gently wring it with your hands. You can put the plant pot in warm water for 30 minutes and then gently mash it.
Flushing and inspection
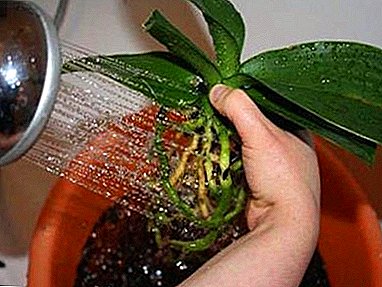 After removing the plant, gently shake off the remnants of the substrate from the roots.
- Then the orchid is dipped into the basin, the roots are filled with warm water and left for 15-20 minutes.
- After this procedure, the soaked substrate will be much easier to separate from the roots. If some remnants of the substrate are firmly attached to the roots, it is better to leave them in order not to injure the plant.
- After washing the plant, you should carefully examine it for the presence of pests, and also make sure that the roots of the plant are healthy.
 After removing the plant, gently shake off the remnants of the substrate from the roots.
What if pests and problems were discovered?
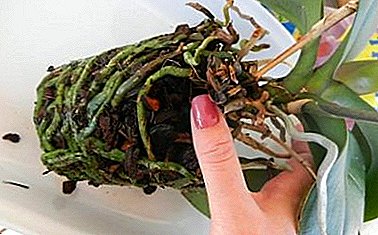
Healthy phalaenopsis roots should be dense, elastic, without soft wet spots, have a green or white color. If the plant has dry, darkened or damaged roots, they should be removed with disinfected scissors.
Sections are treated with crushed activated carbon, cinnamon or chalk.. You should also remove and dried yellow leaves. To do this, they are first cut along the central vein, and then pulled at the ends in different directions, thus removing from the stem.
The cliff is treated with activated carbon or alcohol-containing drugs. If pests are found on a plant, it must be treated with a special compound according to the instructions. Before treatment, remove all diseased parts of the plant.
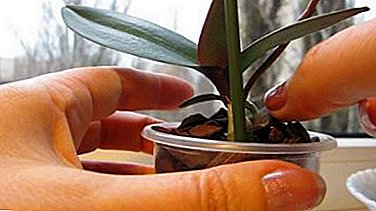
Place in a new pot and ground
- At the bottom of the pot is placed a drainage layer of expanded clay, pebbles or pieces of cork bark.
- Next should be placed in the pot phalaenopsis root system.
- Holding the plant on weight, you need to carefully fill the spaces between the roots with a fresh substrate.
The orchid should be firmly fixed in the pot, be centered, but not too deep in the substrate to avoid rotting of the lower leaves. These leaves are better placed on the surface, and the topmost slightly cover with bark.
How to care after the procedure?
- After transplantation you need to put phalaenopsis in a shaded place, protected from drafts, for about 10 days. If for some reason this cannot be done, the plant should be sprayed and covered with a plastic bag. To avoid fungal diseases, you should air the plant every day for 1-2 hours.
- The temperature in the room with an orchid should be + 20-22 ° C.
- The first 3-4 days phalaenopsis does not need watering. You can spray the moss, while carefully watching that the water does not fall into the sinuses.
- For the peduncle you need to make a support, and if necessary, not one. A bamboo stick with a clip can be used as a support.
After 2-3 weeks, the transplanted plant must fully adapt to the new substrate.. From now on, phalaenopsis can be watered by soaking.
- To do this, lower the orchid pot for 5 minutes in warm water, gently holding the bark.
- Then take out the pot, let the water go and put the plant in place.
You should also spray the plant daily and feed it in the spring-summer season.
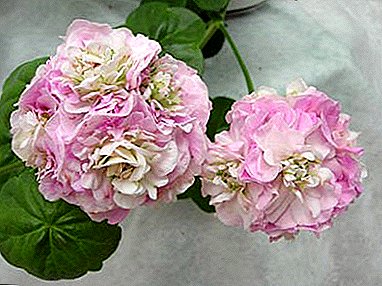
A photo
In the photo below you can see phalaenopsis transplant:


Consequences of mistakes
Phalaenopsis transplantation during flowering may weaken the plant, reset flowers, stop flowering and impair growth. Such a flower will be significantly weakened and may become less resistant to diseases.
Timely phalaenopsis transplantation and proper procedure are the key to healthy development and functioning of the plant. By observing carefully and following all the recommendations, it is possible to avoid possible errors and negative consequences for the flower.