 If you decide to try your hand as a poultry farmer, and do not know which model incubator to give preference to, you should pay attention to time-tested models that deserve a lot of good feedback. Another important feature is the price-quality ratio. The following describes an incubator model that has a good reputation and provides decent features at an affordable price.
Description
Incubators brand "Blitz" are made in Orenburg. The device is designed for incubating poultry eggs at home.
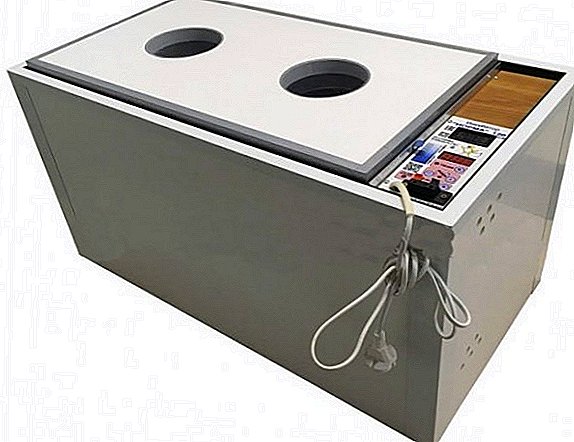
The model "Norma 120" in its technical characteristics is similar to the model "Blitz-72 Ts6", differing only in material (it is made of expanded polystyrene), the size of the body and the number of eggs laid. The case 3 cm thick provides good thermal insulation. Due to some design features, the mass of the device has decreased, but its noise has increased.
Read about the technical characteristics and features of the incubation of eggs in the incubator "Blitz norm 72".
Specifications
The main technical characteristics of the incubator "Blitz Norma 120":
- weight - 9.5 kg;
- dimensions (L / W / H) - 725x380x380 mm;
- working temperature - 35-40 ° C;
- temperature error - +/- 0.1 ° C;
- adjustable humidity range in the chamber - 35-80%;
- hygrometer error - up to 3%;
- food - 220 (12) V;
- battery life - up to 22 hours;
- power - 80 watts.
 The device is designed to work indoors. Recommended conditions for the normal functioning of the device:
- ambient air temperature - 17-30 ° C;
- relative humidity - 40-80%.
Learn about the features of breeding chicks in the incubator "Kvochka", "Ideal hen", "Ryabushka 70", "Neptune", "AI-48".
Production characteristics
According to the instructions, the device is designed to hatch eggs not only chickens, but also other types of poultry. The capacity (maximum number of eggs) is as follows:
- quail - up to 330 pcs .;
- chicken - 120 pcs .;
- goose - 95 pcs .;
- turkey - 84 pcs .;
- duck - 50 pcs.
Important! The incubation material can not be washed, this procedure reduces hatchability.
Incubator Functionality
The functionality of the device is quite simple and informative. All the necessary information is displayed on the top panel of the device, where the following sensors are located:
- indicators of heating and turning mechanism;
- food from an autonomous source;
- relative humidity level;
- digital display of the thermometer with the ability to set the required temperature.
 The control unit of the incubator "Blitz Norma"
Advantages and disadvantages
Among the advantages of the device are the following:
- affordable price;
- ease of use;
- low weight;
- sufficiently accurate control system - the error is minimal and most often does not exceed the declared deviations;
- transparent top panel allows you to see the process of incubation;
- additional trays facilitate the incubation of different types of eggs;
- low power consumption;
- good thermal insulation properties;
- high-quality swivel mechanism ensures uniform heating.
Did you know? The prototype of modern incubators was invented in ancient Egypt. Special rooms were built there, the temperature in which was maintained by the heating system. Inside the rooms were placed eggs intended for incubation.There are few flaws in this model, but they are still:
- not quite comfortable topping up the water;
- quite high noise level;
- laying eggs has to be done in the grille already fixed in the device, and given that it is necessary to place the incubation material at an angle, it is quite inconvenient to do this.
Instructions on the use of equipment
The whole process of incubation can be divided into 4 stages:
- Preparing the device to work.
- Selection and laying of the incubation material.
- Directly incubation.
- Hatching and jigging chicks.
Familiarize yourself with the incubation of chicken, quail, duck, turkey, goose eggs, and also guinea fowl eggs.
The level of automation "Blitz Norma 120" is such that, with proper implementation of the first two points, incubation takes place with little or no human intervention. 
Preparing the incubator for work
- Place the incubator on a horizontal, level surface; it should be clean and dry. The presence of a slight odor emanating from the apparatus, before the start of operation, is allowed.
- Set the humidity level to the appropriate position. For chickens and other non-swimming birds, this figure should correspond to 40-45%; for ducks and geese it is necessary to set the humidity to about 60%. Shortly before the end of incubation, the indicator is increased to 65-70% and 80-85%, respectively.
- Connect the device power from the battery.
- At the bottom of the chamber, near the side walls, install containers with water (42-45 ° С).
- Lower the egg laying tray into the chamber so that one side of it is on the gearbox shaft, and the other is on the support pin, then close the device with the lid and turn on the power.
- Make sure that the fan and the swivel mechanism function normally. The tilt angle of the tray should be 45 ° (+/- 5), turning every 2 hours.
- Set the temperature on the thermostat to 37.8 ° C.
- After 45 minutes, check the thermometer readings - they should not change.
- Using a hygrometer, after 2.5-3 hours, check the humidity level inside the chamber.
 After all the above procedures have been carried out, you need to check the operation of the device in autonomous power mode. To do this, you must disconnect the device from the network. In doing so, you should hear a beep to the backup power source, and all systems should continue to operate smoothly.
Important! When connecting the battery, be sure to check the polarity.
Egg laying
When the device is tested and found to work, you can proceed to the selection and laying of eggs. The incubation material must meet the following requirements:
- be of medium size and natural shape, without cracks, defects and growths;
- eggs should be taken from young laying hens (8-24 months) from a livestock in which there is a rooster;
- the incubation material must be clean, but it must not be washed;
- before incubation, the eggs should be no more than 10 days in appropriate conditions (10-15 ° C, regularly roll over);
- The material must be heated to 25 ° C.
After the end of the visual inspection of the eggs must be checked with the aid of the ovoscope.  Checking eggs with an otoscope. At the same time, attention should be paid to such details:
- the yolk should be clearly separated from the protein, not touch the shell, be in the center;
- the presence of stains, blood inclusions, opacities is unacceptable;
- the air chamber must remain stationary at the blunt end.
After collecting the required batch of incubation material that meets the requirements, you should check the water level in the tanks; if necessary, add more with the help of the funnel supplied.
Learn how to check eggs with an ovoscope, and whether you can make an ovoscope with your own hands.
After checking the temperature readings and making sure that they are stable, you can place the eggs on the grid, pre-installed in accordance with the instructions. They are placed close to each other, with a sharp tip downwards, cardboard is stuffed into the gaps. If the batch is small, free space is filled with the included grill.
Incubation
This model of the incubator carries out all the main processes independently. The intervention of the poultry farmer is limited to controlling temperature, humidity and topping up water (2-3 times a week).  At a certain stage of incubation, it will be necessary to turn off the device for a short time, slightly cooling the material. Such a procedure is an imitation of the temporary weaning of the hen.
Once a week, ovoscopy should be performed to remove unfertilized or frozen eggs in the lot. The last ovoscopy is carried out no later than 2 days before the expiration of the incubation period.
Hatching chicks
2 days before the expected withdrawal (approximately 19-20 days), control ovoscopy is carried out, the turning mechanism is turned off, and cardboard or dense fabric is filled between the pallet and the walls.
It is useful to know why the chicks did not hatch in the incubator.
This is done so that the hatched chicks do not fall into the tanks with water. At the same time, the sealing cardboard is removed from the gaps, and the eggs are placed freely.
Video: Hatching chickens in the Blitz Norma 120 incubator Since the chicks hatch for some time (perhaps during the day), the camera is checked every 5-7 hours on the day of the proposed hatch. Appeared chickens are deposited, dried and fed.
Did you know? Among the poultry there are a lot of breeds that have very weakly developed parental instincts. This is especially true of hybrid chickens, they often lack the patience to sit on the eggs for 3 weeks. In such cases, for breeding chickens you have to either lay eggs under good hens (including other species of birds), or use an incubator.
Device price
The average price of the Blitz Norma 120 incubator in the Russian Federation is about 13,000 rubles, the Ukrainian poultry farmer will have to pay about 6,000 hryvnias. That is, in order to become the owner of an incubator with quite serious characteristics, you need to spend about $ 200. 
findings
Incubator "Blitz Norma 120" - one of the best in its class and, accordingly, the price range. It simply has no real, tangible flaws that affect the main purpose of such devices - egg incubation. All of the above disadvantages can hardly be called flaws - rather, these are minor, minor inconveniences, noted only for the sake of objectivity. And if you add impressive brood figures to the above, up to 95%, then doubts about the advisability of purchasing this incubator disappear altogether.
Moreover, importantly, due to the simplicity of operation, sufficient automation and reasonable price, this model is suitable for both novice poultry farmers and experienced farmers, who are satisfied with the quantitative characteristics of the device.


